Configuration
The template manages configuration in a few different ways:
- Front-end configuration (i.e. enabled features, feature settings, domain to use for serverless functions) are managed via the flex-config package.
- When running locally, this configuration is overridden by the
public/appConfig.jsfile in the plugin. - If per-worker overrides are configured, those take precedence over all other configuration.
- When running locally, this configuration is overridden by the
- Serverless configuration is managed via
.envfiles in the serverless package(s). These files are automatically generated based on the.env.examplefile in the package, so that sensitive information does not need to be committed to a repository.- The setup script is used to perform this automatic population.
Front-end configuration
Hosted environment
Generally speaking, when running the flex-project-template Flex plugin, configuration is loaded from the hosted Flex configuration endpoint. When the flex-project-template is deployed, a custom_data object is injected into ui_attributes that manages configuration for each feature within the template. This deployment is performed by the flex-config package in the template.
Local environment
When running Flex locally, the configuration from hosted Flex configuration is loaded, but the configuration in plugin-flex-ts-template-v2/public/appConfig.js overrides anything in hosted configuration. Note: the appConfig.js config is only used locally and has no bearing on a deploy or when on hosted Flex.
The appConfig.js file is created for you as part of the initial local environment setup script, which executes when running npm install in the root template directory. The file is automatically populated with the feature config from the flex-config/ui_attributes.common.json file at the time of creation, as long as the file does not already exist.
Reading configuration within Flex
Several helper functions are available for reading configuration, and can be imported from plugin-flex-ts-template-v2/src/utils/configuration/index.ts. The exported functions from this file are as follows:
-
getFeatureFlagsGlobal: Fetches thecustom_dataobject from the hosted Flex configuration, providing all of the global feature configuration and global common configuration for the template. If running locally, any values contained withinplugin-flex-ts-template-v2/public/appConfig.jswill also be returned, overriding the corresponding hosted Flex configuration values. -
getFeatureFlagsUser: Fetches theconfig_overridesobject from the current worker's attributes. This object contains any configuration values that were set on the worker level, overriding the corresponding global configuration values. -
getFeatureFlags: Returns the complete effective configuration. This is the function you should use in most cases when determining a configuration value. For each configuration value, the value returned will be as follows:- If a override has been configured on the worker, that will be returned.
- If no worker override has been configured, and the plugin is running locally, and the value is configured in
appConfig.js, the value fromappConfig.jswill be returned. - Otherwise, the hosted Flex configuration value will be returned.
-
getUserLanguage: Returns the currently configured language, using the same order of precedence asgetFeatureFlags. If the configured value isdefault, the browser's language will be returned. Otherwise, if no value is configured,en-USwill be returned. -
getFlexFeatureFlag: Returns the effective enablement state of the provided feature flag name. -
getLoadedFeatures: Allows you to query for enabled loaded features at runtime. See checking for enabled features. -
validateUiVersion: Returns whether or not the current Flex UI version intersects the provided semver range. Use this to conditionally perform logic based on the running Flex UI version.
Checking for enabled features
When developing your feature, it may be beneficial to know which other features are enabled so that your feature can robustly handle all scenarios. For example, the pause-recording feature may wish to know if the dual-channel-recording feature is enabled, in order to determine what recording object to pause. While you can check the loaded configuration for which features are enabled, this does not necessarily reflect which features are actually loaded--for example, if a feature was removed from the codebase but not from the configuration. Therefore, a bespoke utility has been created for this purpose.
The configuration utility in the template plugin (located at plugin-flex-ts-template-v2/src/utils/configuration/index.ts) allows you to query for enabled loaded features at runtime by calling the exported getLoadedFeatures() function.
Example usage within a feature:
import { getLoadedFeatures } from '../../utils/configuration';

const isDualChannelEnabled = () => {
  return getLoadedFeatures().includes('dual-channel-recording');
};
If getLoadedFeatures() is accessed before all features have loaded, it will return an empty array, along with the following console log:
Caution! getLoadedFeatures() was called before all features were loaded, so none will be returned.
When using this function, be sure to call it only after all features have loaded, and validate that the above error message does not appear within your browser's JavaScript console.
Configuration management
The custom_data object
The template maintains the configuration that is deployed to hosted Flex configuration in version control under the flex-config folder. Here, you will find ui_attributes.common.json file containing the main configuration set.
At the time of a GitHub action script deploy of the template, when an environment is provided, a new file is generated from ui_attributes.example.json and it is called ui_attributes.<env-name>.json (unless it already exists). The contents of this file are merged over the top of the ui_attributes.common.json file. After merging the configuration, any placeholder values, such as the serverless domain, are replaced as part of the deployment scripts, and the final configuration set is pushed to the hosted Flex configuration API.
If you wish to provide alternate feature configurations per environment, such as IDs or for testing different settings, you may create this file yourself. Simply copy ui_attributes.example.json to ui_attributes.<env-name>.json, perform the desired changes, and commit the file to the repository. Placeholder values within this file will continue to be automatically replaced as described above during deployment.
The data model
The custom_data model that lives in ui_attributes follows this schema:
{
"custom_data": {
    "common": {
      // template-wide config options are here
    },
    "features": {
      "<feature-name>": {
        "enabled": true,
        // other feature attributes
      }
    }
}
If using the add-feature script, the feature name provided may include hyphens. However, the feature name used in the custom_data will replace the hyphens with underscores to make the variable name JavaScript parser compliant.
Ultimately, enablement of each feature is managed by this object as it appears in the hosted Flex configuration (or appConfig.js if running locally)
Common configuration
Some configuration is not specific to a feature, and is included in the common section. This section is intended to be used for items that could be used by several features.
If you have two features which need to share a piece of configuration, consider that it likely makes more sense to combine the features rather than using common configuration.
The following common configuration properties are included by default:
log_level- The minimum log level to output to the browser console.infoby default; may be set todebug,log,warn,info, orerroraudit_log_ttl- The number of seconds before audit events should be removed from Sync.1209600(two weeks) by default. Set to0to keep items indefinitely.teams- Array of team names used by various features to populate team lists, matching the values used in worker attributes.departments- Array of department names used by various features to populate department lists, matching the values used in worker attributes.
Per-worker configuration overrides
When performing testing, or for managing a diverse contact center, you may wish different workers to have a different feature configuration. This could be variations of common settings, feature settings, or enabling a different feature set altogether. You may add a config_overrides object to a worker's attributes to override any feature configuration, taking priority over both the hosted Flex configuration and the local appConfig.js (if applicable).
For example, if the activity-reservation-handler feature is globally enabled but you wish to disable it for a specific worker, you can add the following to the worker's attributes to disable it:
{
"config_overrides": {
    "features": {
      "activity-reservation-handler": {
        "enabled": false
      }
    }
}
Configuring skills
The taskrouter_skills.json file under the flex-config directory defines skills that should be automatically deployed. The skills in the file will be merged with any skills existing in the environment. By default this contains two sample skills, template_example_sales and template_example_support.
Be sure to use skill names without spaces!
Here is an example of how you can populate this file:
[
  {
    "minimum": null,
    "multivalue": false,
    "name": "billing",
    "maximum": null
  },
  {
    "minimum": null,
    "multivalue": false,
    "name": "support",
    "maximum": null
  },
  {
    "minimum": null,
    "multivalue": false,
    "name": "offline_work",
    "maximum": null
  }
]
Updating the front-end config
There are two strategies for managing the configuration, which are mutually exclusive:
Admin UI
You can use the admin-ui feature, which is the default management style, to manage the configuration from within the Flex UI. This method is preferable when configuration needs to be changed frequently, or when non-developers need to be able to view and update the configuration.
When running locally, the admin-ui feature directly ignores what is in appConfig.js and shows only what is in hosted Flex configuration or what has been overridden using the per-worker feature overrides. This can cause confusion, and for that reason, admin-ui is disabled by default via appConfig.js when running the template locally.
When using this strategy, configuration can still be updated from outside the Admin UI via deployment scripts. However, only new configuration will be added and no existing values will be overwritten.
Infrastructure-as-code (version control)
Alternatively, you can also choose to manage the configuration via version control. This method is preferable when change control procedures are required within your organization, as configuration is stored and managed within the code repository, and deployed as part of the standard deployment scripts.
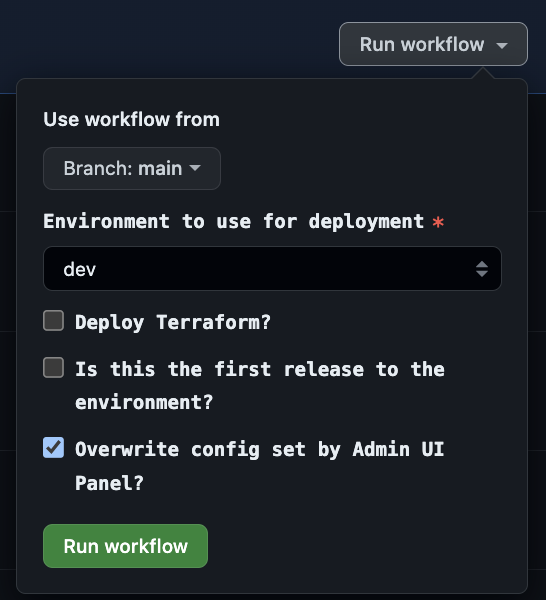
As the default management style is to use the admin-ui feature, when doing a deploy of flex-config, it will only deploy the net new changes by merging the new config with that which is deployed already. To override this behavior, and deploy exactly what is in version control, you can select the Override config set by Admin UI Panel? option when deploying via the GitHub Actions script:
It is generally a good idea to disable the admin-ui feature if you are planning to use this style of configuration management. This is because it can create confusion to have changes made in the admin UI get overwritten by the deploy.
Serverless configuration
The template runs a setup script as part of the GitHub Actions deploy process (npm run postinstall) to automatically identify and populate any missing configuration and environment variables used by template features. This includes items such as the TaskRouter workspace SID, Chat and Sync service SIDs, TaskRouter workflow SIDs, serverless domains, and more.
When the setup script is run as part of the GitHub Actions deploy process, within the serverless package, a .env.<environment name here> file is used if present, or generated from .env.example if not.
Influencing the automatic configuration
If you need to add (or modify existing) environment variables that are secrets or that differ depending on environment, you can influence the automatic configuration easily.
When the setup script runs, it finds strings matching the pattern <YOUR_VARIABLE_NAME_HERE> in each config file it is parsing. For each variable name found this way (in our example here, the variable name is VARIABLE_NAME_HERE), the script will first check for an existing environment variable with that name, and use it if present. All secrets and variables configured in the GitHub environment are made available to the script as environment variables.
If the value is not found in the environment variables, the scripts/config/mappings.json file is consulted to map that variable to a value (such as a SID or serverless domain) using name-matched results from the Twilio API. The format of this file is as follows:
{
  "VARIABLE_NAME_HERE": {
    "type": "tr-workflow", // Type of Twilio resource to fetch the value of: serverless-domain, serverless-service, serverless-environment, serverless-function, studio-flow, tr-queue, tr-workspace, tr-workflow, chat-service, or sync-service
    "name": "My Workflow", // Name of resource to find
    "localValue": "My Other Workflow", // Optionally override the name property with a different one when running locally
    "fallback": "/(Assign.*Anyone)/", // Optionally define a fallback in case the defined name is not found. Note that this regex format is allowed in any of these properties except 'type'.
    "parent": "PARENT_VARIABLE_NAME_HERE" // Required for serverless-environment, serverless-function, tr-queue, and tr-workflow types. Indicates the variable representing this item's parent object (of type serverless-service or tr-workspace, depending on this item's type).
  }
}
Let's illustrate how to use this knowledge in a practical manner:
- Let's say I am adding an integration with another service, and need to store the API key for that service as a secret, but make it available to my serverless service when deployed to an environment. In this case, I would perform the following:
- In the appropriate
.env.examplefile, add a line for the new variable, which we will callINTEGRATION_API_KEY. The new line would beINTEGRATION_API_KEY=<YOUR_INTEGRATION_API_KEY>. Commit this change. - In the GitHub environment configuration, add a new secret called
INTEGRATION_API_KEY, populated with the necessary value. - Now, when I do a deploy to an environment, the setup script will use the value I specified in the GitHub environment secret to populate the service's
.envfile. Nice!
- In the appropriate
- Now let's say I am adding a feature which requires a TaskRouter workflow as a dependency. The workflow is called "Feature Workflow" in each environment. The serverless function(s) for the feature will need the SID of this workflow for task creation purposes. In this case, I would perform the following:
- In the appropriate
.env.examplefile, add a line for the new variable, which we will callFEATURE_WORKFLOW_SID. The new line would beFEATURE_WORKFLOW_SID=<YOUR_FEATURE_WORKFLOW_SID>. - In the
scripts/config/mappings.jsonfile, add a tr-workflow mapping for the new variable:
"FEATURE_WORKFLOW_SID": {
  "type": "tr-workflow",
  "name": "Feature Workflow"
}- Commit the changes.
- Now, when I do a deploy to an environment, the setup script will fetch the SID of the TaskRouter workflow in the environment named "Feature Workflow" to populate the service's
.envfile. Nice!
- In the appropriate
Manually define the configuration
We can commit a .env.<environment name here> file, for example, .env.dev, to pre-define the environment variables. To do so, perform the following steps:
- Within the serverless directory you wish to pre-define configuration for, copy the example
.env.examplefile to a new file named.env.<environment name here>(for example:.env.dev). The environment name used here must match the environment name(s) configured in GitHub. - Populate the variables you wish to skip auto-population. Important: Do not populate sensitive information such as auth tokens or API key secrets. You may leave the placeholders for these items, and they will continue to be auto-populated securely.
- For your safety, the
.gitignorefile in the repository root prevents all custom.env.<environment name here>files from being committed. Once you have confirmed your new environment file does not contain any sensitive information, you will need to add it as an exclusion to the.gitignorefile. You may do this by appending a line that contains the environment file name with a preceding!(for example:!.env.dev) - Now, you should be able to commit the environment file.
Setup script reference
The setup script when run via npm install performs the following operations:
- Establish the Twilio account to use
- Automatically populate the
.env.<environment name here>file for each package - Create and populate the
plugin-flex-ts-template-v2/public/appConfig.jsfile if running locally - Run
npm installfor each package, so that it is ready to use.
Several parameters are accepted when the script is run via npm run postinstall, which can be used to customize the script's functionality. These parameters can be set as follows:
overwrite
By default, the script will fill placeholders in files that already exist, but if the already-filled placeholder needs to be changed, or if new variables were added, those changes would not be made. The overwrite option will always start with a fresh file based on the example file, allowing you to easily regenerate your environment files:
npm run postinstall -- --overwrite
skip-install
Normally the script will run npm install for each package. However, if you only wish to perform configuration (such as if the install has already been performed), you may skip this step as follows:
npm run postinstall -- --skip-install
uninstall
If you would like to completely remove the installed npm dependencies:
npm run postinstall -- --uninstall
This will remove node_modules and package-lock.json within each package before dependencies are installed (unless --skip-install is also specified, in which case dependencies would be removed but not reinstalled).
skip-packages
This will cause the script to not process any packages (the default set or any provided via --packages=). This means that no environment files or installations will be performed. This is convenient to use in conjunction with the --files= parameter when you are using the script to process files outside or independent of a package.
npm run postinstall -- --skip-packages
skip-env
This will cause the script to not perform any environment variable population; only installation (and/or uninstallation) will be performed.
npm run postinstall -- --skip-env
skip-plugin
When the packages or skip-packages parameters are not specified, the Flex plugin package will be installed as part of the default packages. This option prevents the Flex plugin package from being installed.
npm run postinstall -- --skip-plugin
env
By default, the script will assume you are running locally and not deploying to a specific environment. When running in CI, the ENVIRONMENT env var is set, which the script uses to determine the environment being deployed. However, you can override this behavior by specifying an environment manually as follows:
npm run postinstall -- --env=dev
packages
The setup script, by default, will automatically perform its steps for the following packages:
- flex-config
- plugin-flex-ts-template-v2
- serverless-functions
- addons
However, you can specify the relative path to any npm package(s) for the script to process, such as if you have added your own packages to the template, or if you want to save time in CI scripts. You can provide a comma-separated list of packages as follows:
npm run postinstall -- --packages=flex-config,serverless-schedule-manager
This is ignored if the --skip-packages parameter is also specified.
files
In most cases, the setup script is used for processing packages. However, you may wish to populate variables within individual files outside or independent of a package. To do so, provide the path of the "example" file containing placeholders. The script will create a copy of the file with the placeholders filled, and the example in the filename replaced with the current environment (if none is specified, local is used).
You can provide a comma-separated list of files as follows:
npm run postinstall -- --files=test/config.example.json,terraform/example.tfvars