Install the template on hosted Flex
Time to complete: ~8 minutes
These steps require a currently-maintained version of Flex UI 2.x to be configured on your Flex account, and the TaskRouter workspace name to be the default (containing "Flex Task Assignment"). If you have already deployed plugins from the Flex Plugin Library, please read this note first.
- Create your own repository using the template.
- (Optional) After creating your repo, you may also want to attach the history to your new repository to be able to later pull in future updates--this can also be done later.
If you are on the free GitHub tier, the repository will need to be public. If you are on the free tier and still want to use a private repo you will need to clone the deploy script to have dedicated secrets per environment.
-
Create a Twilio API key and secret for your account, which we will use in the next step.
-
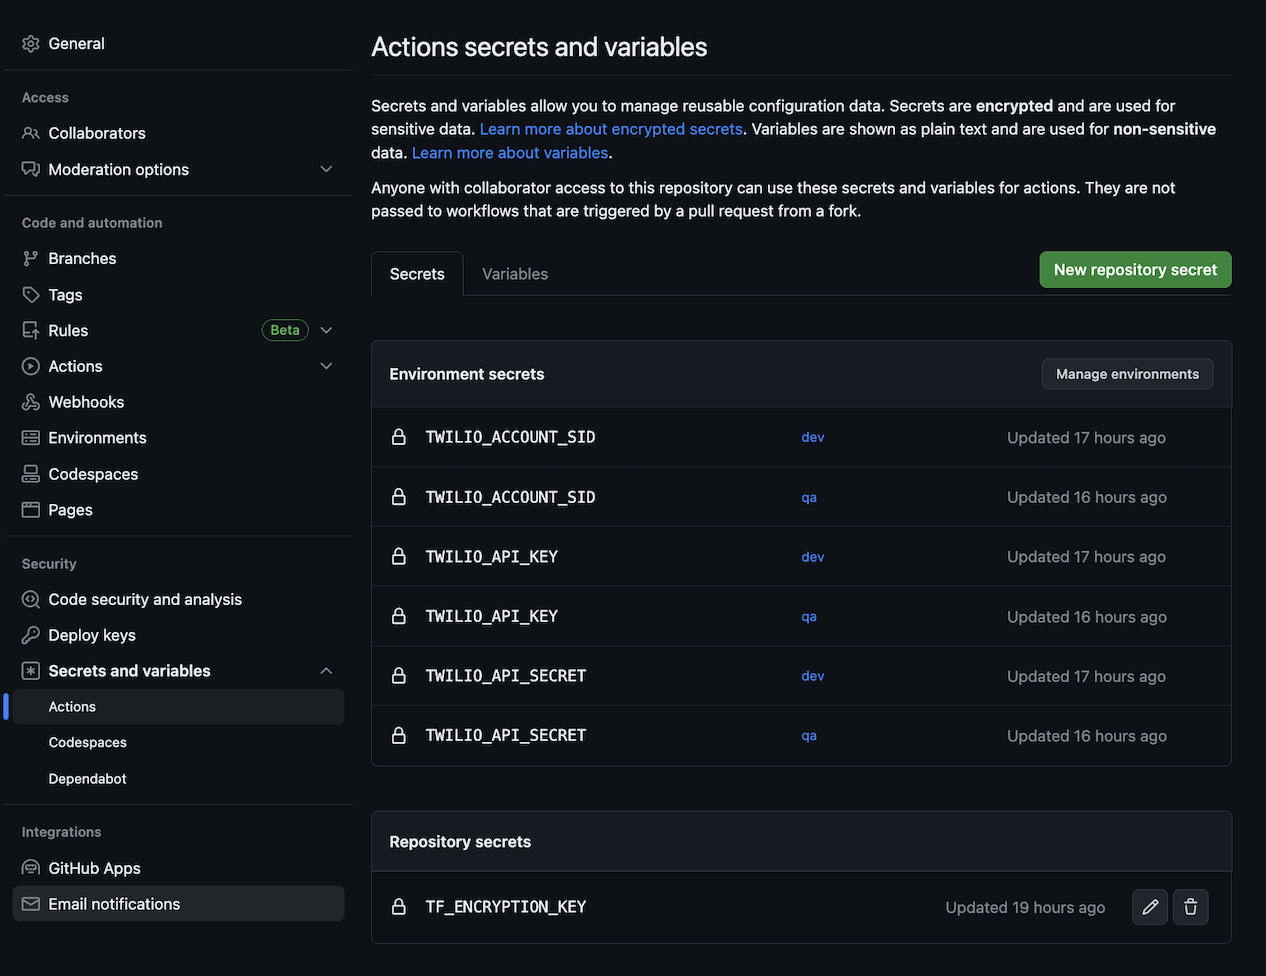
In GitHub, navigate to the repository you created in step 1, click the Settings tab -> Environments -> "New Environment"
- For the environment name, do not include spaces or other special characters except hyphens and underscores
- Add the following secrets for that environment:
TWILIO_ACCOUNT_SID- the account sid you want to deploy toTWILIO_API_KEY- the api key or key "sid" as its otherwise knownTWILIO_API_SECRET- the api secretTF_ENCRYPTION_KEYthis can be any string value you want
- your environment secrets should look something like this (TF_ENCRYPTION_KEY can be a repo or environment secret)
-
In your GitHub organization settings, provision an Ubuntu 24.04 runner named
flex-deploy. Alternatively, you may modify the workflows to use a standard shared runner type such asubuntu-24.04.
Twilio recommends always using runners provisioned within your organization, as opposed to using the standard shared runners, to reduce your exposure to supply chain attacks. Running deploy scripts on a compromised runner could expose your Twilio account credentials to a malicious actor.
- Log in to Twilio Console, navigate to the Flex section, and validate that a currently-maintained version of Flex UI 2.x is the configured version.
- Optionally navigate to the Flex console and enable the Flex dialpad (this is required for some features)
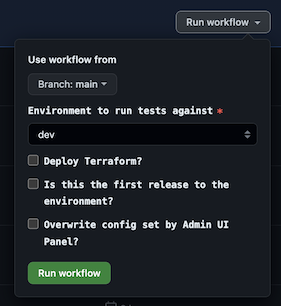
- Navigate over to GitHub actions of your repository and select the
Deploy Flexaction script, select the environment you want to deploy, and check the boxes forIs this the first release to the environment?Deploy Terraform?(as cautioned below)
These deploy steps will set up TaskRouter and Studio configuration to allow more complex features to work out-of-the-box. The following resources will be affected when selecting the Deploy Terraform? option:
TaskRouter resources affected
- Workflows
- Task Queues
- Activities
- Task Channels
| Name | Existing or New | Description |
|---|---|---|
| Template Example Assign to Anyone | New | Used by example Studio flows and demonstrate filters for example queues |
| Template Example Chat Transfer | New | Workflow that supports the conversation transfer feature |
| Template Example Callback | New | Workflow that supports the requeuing of callbacks and voicemails from the callback and voicemail feature |
| Template Example Internal Calls | New | Workflow that supports the internal call feature |
| Template Example Park/Resume | New | Workflow that supports the park interaction feature |
| Name | Existing or New | Description |
|---|---|---|
| Template Example Everyone | New | Same as out-of-box Flex version |
| Template Example Sales | New | Sample queue for "Sales" calls |
| Template Example Support | New | Sample queue for "Support" calls |
| Template Example Internal Calls | New | Queue that supports the internal call feature |
| Name | Existing or New | Description |
|---|---|---|
| On A Task | New | Activity to support the activity reservation handler feature |
| On A Task, No ACD | New | Activity to support the activity reservation handler feature |
| Wrap Up | New | Activity to support the activity reservation handler feature |
| Wrap Up, No ACD | New | Activity to support the activity reservation handler feature |
| Name | Existing or New | Description |
|---|---|---|
| Chat | Existing | No modifications from out-of-box Flex version |
| Voice | Existing | No modifications from out-of-box Flex version |
Studio resources affected
| Name | Existing or New | Description |
|---|---|---|
| Template Example Callback Flow | New | Example usage of the callback and voicemail feature, adding a callback or voicemail option while waiting in queue |
| Template Example Messaging with Parking Flow | New | Example for the park interaction feature, using a workflow that supports the routing of parked interactions |
| Template Example Schedule Flow | New | Example usage of the schedule manager feature, adding a schedule lookup with different responses based on the result |
If you have customizations within the resources listed as 'Existing' (or have created your own resources with the same name as ones listed as 'New') and do not wish to overwrite them, uncheck the Deploy Terraform? input box.
Unchecking this means features mentioned in the resource descriptions above will require manual setup, which can be found in the respective feature's documentation.
- Run the workflow.
- This will deploy the assets to your environment with the default features enabled. See Feature library Information for further details of whats enabled by default.
- Environment properties will be automatically populated based on the deployed Flex configuration, including service and workflow SIDs. See this page for information on how to influence this configuration.
All done! Once the workflow successfully completes, the template has been installed.